
|
When creating a SureSelect design using the wizard, SureDesign allows you customize the parameters used for probe selection. Your selections for these parameters affect the specific target regions of interest included in probe selection, the density of probes across the targets, and the replication of probes within the design.
This help topic uses images from the UCSC genome browser to visually describe how each parameter impacts which probes SureDesign selects for a custom design.
The masking parameter in the SureSelect design wizard allows you to select the level of stringency that the program uses to mask repetitive regions (the higher the stringency, the more regions of the genome that SureDesign masks).
Figure 1 shows the difference between a design created with the No Masking option (see the track in green) and a design created with the Most Stringent masking option (see the track in purple). The Target Regions track (in gray) displays the target regions of interest specified for both designs, which are the coding exons and 5' and 3' UTRs of the human MDM2 gene with 10 bp of flanking sequence. Note that the design created with the Most Stringent masking option (purple) does not cover regions of the genome that overlap with the RepeatMasker track (black), while the design created with the No Masking option (green) covers those regions.
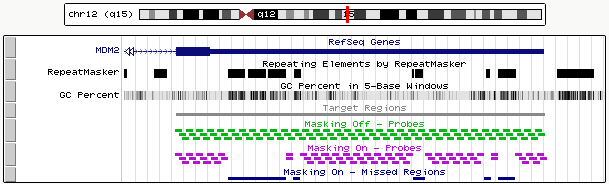
Figure 1: UCSC Genome Browser displaying probe coverage from a design created with the No Masking option (green) and probe coverage from a design created with the Most Stringent masking option (purple). Download BED. View in Genome Browser.
With the boosting parameter, SureDesign can boost the number of copies of GC-rich probes. Boosting these probes can potentially improve the capture of their targeted genomic fragments.
Figure 2 shows the difference between a design created with (orange track) and without (green track) boosting. Note that in the design created with boosting, probes in the higher GC-rich areas are duplicated while these same probes are not duplicated in the design created with no boosting. The right side of the displayed region is less GC-rich, and the probes in that area are not duplicated in either design.

Figure 2: UCSC Genome Browser displaying probes from a design created with the boosting (orange) and probes from a design created without boosting (green).
The density parameter determines the density of probes across the target regions of interest. The density options in the SureSelect design wizard range from 1x to 5x, with each option specifying the number of probes per target nucleotide. For example, when you select a density of 5x, SureDesign selects probes with enough overlap for each nucleotide in the target regions to be covered by five unique probes.
The density parameter also impacts the replication of orphan probes. For a SureSelect design, a probe is considered to be an orphan if it does not overlap with other probes in the design and it is more than 100 bp away from its nearest neighbor probe on either side. A 5x-density design includes five copies of each orphan probe, a 4x-density design includes four copies of each orphan probe, and so on. However, orphan probes in a 1x-density design are exempt from this rule. In these designs, SureDesign duplicates all orphan probes in order to improve their capture performance to a level that is similar to the non-orphan probes in the design.
Figure 3 shows a design created with a 1x density (red track), a design created with a 2x density (purple track), and a design created with a 5x density (yellow track). UCSC's Common SNPs track at the top of the image (in black) shows the location of common SNPs in the region. The Target Regions track (in gray) displays the target regions of interest for all three designs, which, within the displayed region, is only a small interval overlapping a SNP in the MDM2 gene. Note that in the 5x-density design (yellow), this SNP is covered by five unique probes. The 5x-density design also covers more flanking regions around the SNP than the 1x-density design (red) or 2x-density design (purple). Also note that in the 1x-density design (red), the single probe overlapping the SNP is duplicated because it is an orphan probe. In general, orphan probes are more common in 1x-density designs than in higher density designs.
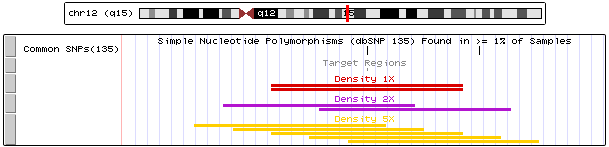
Figure 3: UCSC Genome Browser displaying probes from a design created with the 1x density option (red), a design created with the 2x density option (purple), and a design created with the 5x density option (yellow). Download BED. View in Genome Browser.
See Also
Create a SureSelect design with the wizard