 |
The microarray wizards take you through the steps of the design creation process, enabling you to create a custom microarray design for your CGH experiments. The wizard prompts you to define the target regions of interest, set a few of the probe selection parameters, and then submit a job to SureDesign for the selection of the probe sequences.
To launch the wizard for creating a custom CGH or CGH+SNP microarray design, click Create Designs > CGH. You can also launch the wizard from the Start Designing dashboard on the Home screen.
NOTE SureDesign offers additional wizards through its advanced features option that may be useful to you if want to create designs from existing probes. See Select an advanced wizard for more information.
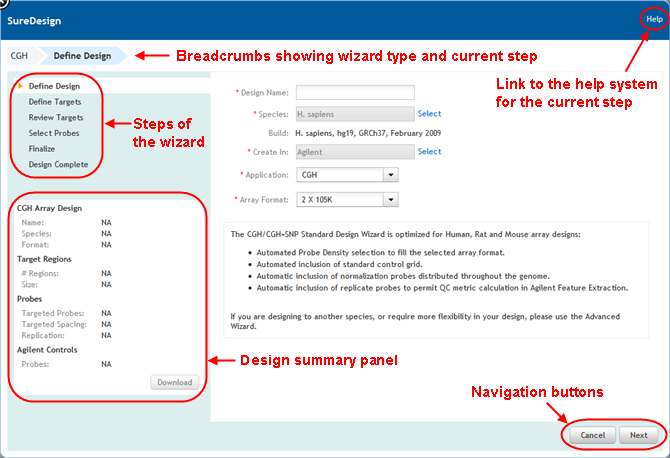
When you launch a wizard, the wizard opens in a new window. The elements of the wizard window are described in the image below.

Use these buttons to navigate the steps of the wizard.
· To advance to the next step in the wizard, click Next.
· To go back a step, click Back.
· To close the wizard, click Cancel, or click the X in the top left corner of the wizard window.
If you close the wizard prior to Step 2, the program cancels the design. If you close the wizard prior to submitting it to SureDesign for probe selection, the program saves the design as a draft.
As you progress through the steps of the wizard, the program populates a summary of the design information on the left side of the wizard window.
The sections of the summary are described in the table below.
CGH Array Design (populated after Define Design step) |
|
Name |
The name of the design. |
Species |
The species of the design's targets. The genome build is indicated in parentheses. |
Format |
The number of arrays per slide and the number of features per array. For example, a format of 2 x 400 K indicates that the design is for a microarray with 2 arrays per slide and 400,000 features per array. |
Target Regions |
|
# Regions | Size |
The number of target regions in the design. | The size of the genomic footprint of the target regions. |
Probes (populated after Select Probes step) |
|
# CGH | Backbone |
The number of CGH probes. | The number of backbone probes. |
Probe Spacing |
The number of bp between the starting positions of adjacent probes. |
CGH Replicates |
The replicate count for each probe in the CGH probegroup. |
# Norm. | Rep. |
The number of normalizer probes. | The replicate count for the replicated normalizer probes. |
# Ctrl. Probes |
The number of control probes. |
% Filled |
The percentage of features on the slide that have a probe assigned. |
Just below the design summary in the wizard window, click Download to open the Download dialog box. This dialog box allows you to download one or more of the files available for the design.
By default, the Download dialog box opens with all files marked for download. Clear the check box for any file that you do not want to download, then click Download to begin downloading the files. The files are downloaded to a compressed folder (*.zip) with a folder name that matches the design name.
The files that are available for download depend on which steps of the wizard you have completed. Click here for descriptions of the microarray design files that are available for download. All file names begin with the design name.
View design in UCSC Genome Browser
Just below the design summary in the wizard window, click UCSC View to open the UC Santa Cruz Genome Browser website with the track for the expected covered regions loaded in the Genome Browser.
NOTE You may need to disable the pop-up blocker in your internet browser in order to use this feature.
The steps of the design wizards are summarized below. For further information on any of the steps, see the detailed help topics for the CGH wizard.
Define Design
Enter a name for the new design, and designate a species and genome build. Once you advance to the next step, the design is saved to your SureDesign folder with a status of Draft. You can find the design in the My Designs table on the Find Designs screen and in the Designs: In Progress dashboard on the Home screen.
Define Targets
Enter the genes and/or genomic coordinates of the targets you want to capture, and specify regions of interest (such as exons and UTRs) within those targets. When you click Next, SureDesign processes the information that you provide in this step to locate the individual target regions that it will use to select the probes.
Review Targets
Review the individual target regions that SureDesign was able to identify based on your target definitions. If necessary, click Back to redefine one or more of your targets.
Select Probes
During this step, SureDesign is processing your probe selection job.
Finalize/Design Complete
This step of the wizard opens after the probe selection job is complete. Its purpose is to allow you to review the probe coverage statistics, download detailed design information, and then either revise or finalize the design.
See Also