
|
SureDesign allows you to create a design for a custom CGH or CGH+SNP microarray using a design wizard that takes you through the steps of the creation process. The CGH wizard will ask you to define the target capture regions (using gene names, transcript IDs, or genomic coordinates) and set a few of the design parameters. You then submit the design to SureDesign and the program's algorithms select the probe sequences for the microarray. When your probe selection job is complete, you receive an e-mail notifying you that your design is ready to be finalized. Once you finalize the design, the custom microarray is available for ordering.
To open the CGH design wizard:
· At the top of the screen, click Create Designs > CGH.
The wizard window opens to Step 1.
NOTE If you have Show Advanced Options marked, you will need to make some additional selections to open a design wizard. See Select a wizard with advanced options.
In this step, complete the fields described below to define the design.
Design Name
Type a name for your design into the field. Alphanumeric characters, hyphens, underscores, and spaces are permitted. The name must be unique within your workgroup.
Species
Specify the species of the experimental sample. The default selection is H. sapiens.
To change the selection, click Select. The Select Species dialog box opens, allowing you to select from a list of available species. If CGH+SNP is selected as the Application, you cannot change the species selection from H. sapiens.
Build
If multiple genome builds are available for the selected species, select the desired genome build in the provided drop-down list.
If no drop-down list for build selection is provided, that indicates that only one genome build is currently available for the selected species. That build is indicated below the Species field.
Specify the folder in which you want to save this design. The default selection is the top-level folder for your workgroup.
To change the selection, click Select to open the Select Folder dialog box, and mark the folder in which you want to save the new design. This dialog box lists the available folders within your workgroup and, if you are a member of any collaborations, lists the collaboration folders to which you have access. (If you later decide you want to change the folder location of the design, you can move it to another folder.)
Application
Select between CGH and CGH+SNP. Designs for a CGH+SNP microarray include probes for detecting copy-neutral LOH regions.
NOTE The CGH+SNP option is only available for H. sapiens arrays.
Array Format
Select the format of the microarray. The format refers to the number of arrays per slide and the number of features per array. The format options that are available in the drop-down list depend on your selection in the Application setting.
SNP Probes
This setting is available if you selected CGH+SNP as the application. Select the probegroup that you want SureDesign to use to as the probe source when selecting SNP probes for the design. These probes are Agilent-designed probes that are evenly spaced across the genome. The options are:
· Genomic_SNP_115k_2015 - contains 115,000 SNP probes; available for array formats 1 x 1 M and 2 x 400 K
· Genomic_SNP_103k_2015 - contains 103,000 SNP probes; available for array formats 1 x 1 M, 2 x 400 and 4 x 180 K
· Genomic_SNP_85k_2015 - contains 85,000 SNP probes; available for array formats 1 x 1 M, 2 x 400 and 4 x 180 K
· Genomic_SNP_60k_2015 - contains 60,000 SNP probes; available for array formats 1 x 1 M, 2 x 400 and 4 x 180 K
· Genomic_SNP_30k_2015 - contains 30,000 SNP probes; available for array formats 8 x 60 K and 4 x 180 K
· Genomic_SNP_15k_2015 - contains 15,000 SNP probes; available for array format 8 x 60 K
Click Next to advance to Step 2.
In this step, define the target regions that you want to include in the design by providing the following information:
Targets
In the Targets text area, enter identifiers for the targets using either of the following approaches:
· Type or paste the target identifiers directly into the text area. List one identifier per line.
· Click Upload to browse to a text file (*.txt) that lists the target identifiers (one identifier per line).
The permitted identifiers are:
· For target genes:
Gene name - enter the gene name (not case-sensitive) as it appears in one or more of the selected databases; example: brca1; see SureDesign gene finder for information on how SureDesign maps a gene name to a specific genomic location
Transcript ID - enter the transcript ID (not case-sensitive) as it appears in one or more of the selected databases; examples: NM_007294, OTTHUMT00000348798, or ENST00000357654; note that SureDesign ignores version numbers included in the transcript ID
Gene ID - enter the numerical NCBI gene ID; example: 672
· For target genomic intervals:
Genomic coordinates - enter the chromosome number and range of nucleotides using the UCSC browser format or BED format.
You can add a string of text, no spaces, after the target genomic interval to be used as the target ID (e.g. chr1:1-100 geneX). If you enter multiple target genomic intervals with the same target ID (e.g. chr1:1-100 geneX and chr1:201-300 geneX), SureDesign will treat the intervals as different regions within the same gene.
Databases
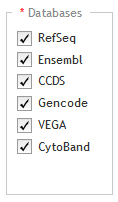
Below the Databases heading, mark the genome annotation databases that you want SureDesign to use to obtain genomic coordinate information for your specified targets. The databases that you have to choose from are dependent on the species you selected in the Define Design step. For H. sapiens, the available database sources are:
RefSeq - US National Center for Biotechnology Information (NCBI)
Ensembl - European Bioinformatics Institute and the Wellcome Trust Sanger Institute
CCDS - Consensus Coding Sequence project (CCDS) of the US National Center for Biotechnology Information (NCBI)
Gencode - US National Human Genome Research Institute (NHGRI) and the Wellcome Trust Sanger Institute
VEGA - Vertebrate Genome Annotation project of the Human and Vertebrate Analysis and Annotation (HAVANA) group at the Wellcome Trust Sanger Institute
CytoBand - CytoBand file from the UCSC Genome Browser
Parameters

In the Replicate Count field, type the desired number of replicates for each probe in the CGH probegroup.
In the drop-down list next to Genome-Wide Backbone, select size of the backbone probegroup. The backbone probegroup contains evenly spaced probes that SureDesign selects from regions of the genome not included in the regions of interest. The size options for the backbone probegroup are:
· None - no backbone probegroup is added to the design
· 5% - the backbone probegroup uses up 5% of all the remaining array features
· 10% - the backbone probegroup uses up 10% of all the remaining array features
· 20% - the backbone probegroup uses up 20% of all the remaining array features
· Fill - the backbone probegroup uses up all the remaining array features
Include Flanking Regions (5' and 3')
In the field, type the number of base pairs of flanking sequence (on the 3' and 5' ends) that you want SureDesign to include on each target. SureDesign does not include flanking bases for targets entered as genomic coordinates.
Allow Synonyms
When this check box is marked, SureDesign compares the gene names you entered into the Targets area to a table of synonyms, and may use the synonym names to map the genes to a genomic location. For example, if you entered HER2 as a target, SureDesign would identify HER2 as a product of the gene ERBB2, and use ERBB2 to map the genomic location.
In cases in which the gene name for your target is also a synonym for another gene, SureDesign treats both genes as targets when Allow Synonyms is marked. For example, if you entered DSP as a target, SureDesign would identify your target as the official gene name for desmoplakin, but it would also identify it as a synonym for the gene encoding dentin sialophosphoprotein. Consequently, the program would map the genomic location to two completely different genes, and in the next step of the wizard (Step 3: Review Targets), you would see both genomic locations listed for the target.
When the Allow Synonyms check box is cleared, SureDesign maps your targets to genomic locations using only the entered gene names.
To fully control how SureDesign maps your targets to a genomic location, enter your targets using transcript IDs, gene IDs, or SNP IDs instead of gene names. Alternatively, after you advance to the Review Targets step of the wizard, click Download to download the Regions.bed file and then edit the genomic locations listed in the file so that they accurately match those of your targets. You can then go back to the Define Targets step of the wizard and paste the genomic locations into the Targets input area.
Click Next to advance to Step 3.
This step provides a chance for you to make sure that SureDesign successfully recognized all of the target identifiers that you entered in the Define Targets step. Review the Target Summary and Target Details before you proceed to the next step.
Target Summary
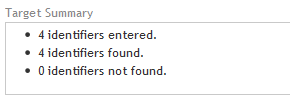
Near the top of the wizard window is a target summary with three bullet points that indicate:
· 1st bullet point: The number target identifiers entered in the Define Targets step.
· 2nd bullet point: The number of target identifiers that SureDesign was able to resolve to a genomic location. (If any of the target identifiers mapped to more than one genomic location, you will notice that the number of targets found is greater than the number of entered. See SureDesign gene finder for more information on how SureDesign maps target IDs to targets.)
· 3rd bullet point: The number of target identifiers that SureDesign was not able to find in any of the databases you selected in the Define Targets step.
 If SureDesign did not accurately identify
all of your target regions
If SureDesign did not accurately identify
all of your target regions
The Target Details table lists the following information for each of the target identifiers that SureDesign was able to locate:
· Target ID - The target ID is the gene name, transcript ID, SNP ID, or genomic coordinates that you used to define the target.
· # Regions - The # Regions column lists the number of target regions within the target.
· Base Pairs - The Base Pairs column lists the total number of base pairs within the regions defined by the target identifier.
· Position - The Position column lists the genomic coordinates identified for the target.
NOTE To perform a careful review of the individual regions, click View targets in UCSC to open the UCSC Genome Browser and see the genomic locations of the regions identified by SureDesign.
To
submit the design for probe selection:
When you are finished reviewing the targets, submit the design to the SureDesign job queue and the SureDesign algorithms will select the probes for your design.
Click Begin
Probe Selection.
A message box opens indicating the e-mail address where Agilent will
contact you when the probe selection job is complete. If desired,
you can enter additional e-mail addresses into the provided field.
Click OK
in the notification message to submit the design to SureDesign.
Your submission is placed in the SureDesign job queue to await probe
selection.
The wizard automatically advances to Step 5.
At this point in the design creation process, SureDesign is processing your probe selection job. The length of time required for SureDesign to complete the job depends on the number of jobs waiting in the queue and the size of your design.
Click Close Design Wizard. When you receive an e-mail from Agilent SureDesign notifying you that your probe selection job was successfully completed, relaunch the wizard and continue creating the design:
Open the SureDesign Home screen.
Locate the design under Designs:
In Progress, and click the Continue icon ![]() .
.
The wizard window opens to Step 6.
NOTE You can monitor the status of your probe selection jobs from the SureDesign Home screen.
When you continue the creating the design after the probe selection job is complete, the wizard opens to the Finalize step. At this step, the wizard window displays the Target Details table. This table provides the following information:
Target ID |
The target ID is the gene name, transcript ID, SNP ID, or genomic coordinates that you used to define the target. |
Interval |
The Interval column lists the genomic coordinates identified for the target. |
Length |
This column lists the number of bp in the interval. |
Coverage |
The percentage of nucleotides in the target regions that are expected to be captured by one or more probes in the design. For SureSelect designs, a target nucleotide is considered to be covered if at least one probe comes within 100 bases of the nucleotide in either direction. The covered region is included as a track in the AllTracks BED file. |
Total Probes |
This number is the total number of unique probes in the design covering the target. |
Median Probe Spacing |
The number of bp between the starting positions of adjacent probes. |
If you want to make further edits to the design, click Modify Design to delete the probes from the probe selection job and return to the Define Targets step. If no further changes are needed and you are ready to finalize the design creation process, click Finalize Design.
NOTE At this step, the information in the design summary panel is complete, and you can download and view the summary files to help you decide if you want to finalize the design or revise it further.
After clicking Finalize Design, the wizard window updates to the Design Complete step, and provides the following information:
Name |
The name of the design. |
Design ID |
The unique, Agilent-assigned design ID. |
Species |
The species of the targets. The genome build is indicated in parentheses. |
Array Format |
The number of arrays per slide by the number of features per array. |
Category |
The type of array (CGH or CGH+SNP) |
# Target Regions |
The number of target regions in the design. |
Total Target Regions Size |
The size of the genomic footprint of the target regions. |
Probe Spacing |
The number of bp between the starting positions of adjacent probes. |
CGH Replicates |
The number of replicate CGH probes in the design. |
# CGH Probes |
The number of CGH probes in the design. |
# SNP Probes (CGH+SNP designs only) |
The number of SNP probes in the design. |
# Control Probes |
The number of control probes in the design. |
# Normalization Probes |
The number of normalization probes in the design. |
# Replicate Probes |
The number of replicate probes in the design. |
# Backbone Probes |
The number of backbone probes in the design. |
Percentage Filled |
The percentage of features on the slide that have a probe assigned. |
Use the action buttons at the bottom of the Finalize Design window to take
further action on the design:
· Click Order to open the Order dialog box, where you can submit a request to receive a price quote.
· Click Mark as Favorite to add the design to your list of favorites. The design will appear in the Designs: Recent and Favorites dashboard on the Home screen.
· Click Download to download one or more design files, including a formatted PDF report that summarizes key information on the design, probes, targets, and the probe selection job.
· Click UCSC View to launch your internet browser to the UCSC Genome Browser page. The design's AllTracks.BED file is loaded in the browser. You may need to disable the pop-up blocker in your internet browser in order to use this feature.
These action buttons are also available from the design details window.